Documentation Index
Fetch the complete documentation index at: https://docs.imagine.art/llms.txt
Use this file to discover all available pages before exploring further.
In the ImagineArt Workflows canvas, nodes are the fundamental building blocks of every pipeline. Every operation—importing a file, running an AI model, trimming a video, combining prompts—lives inside a node. Connect nodes together to form a visual data pipeline that automates your creative process.
What is a node?
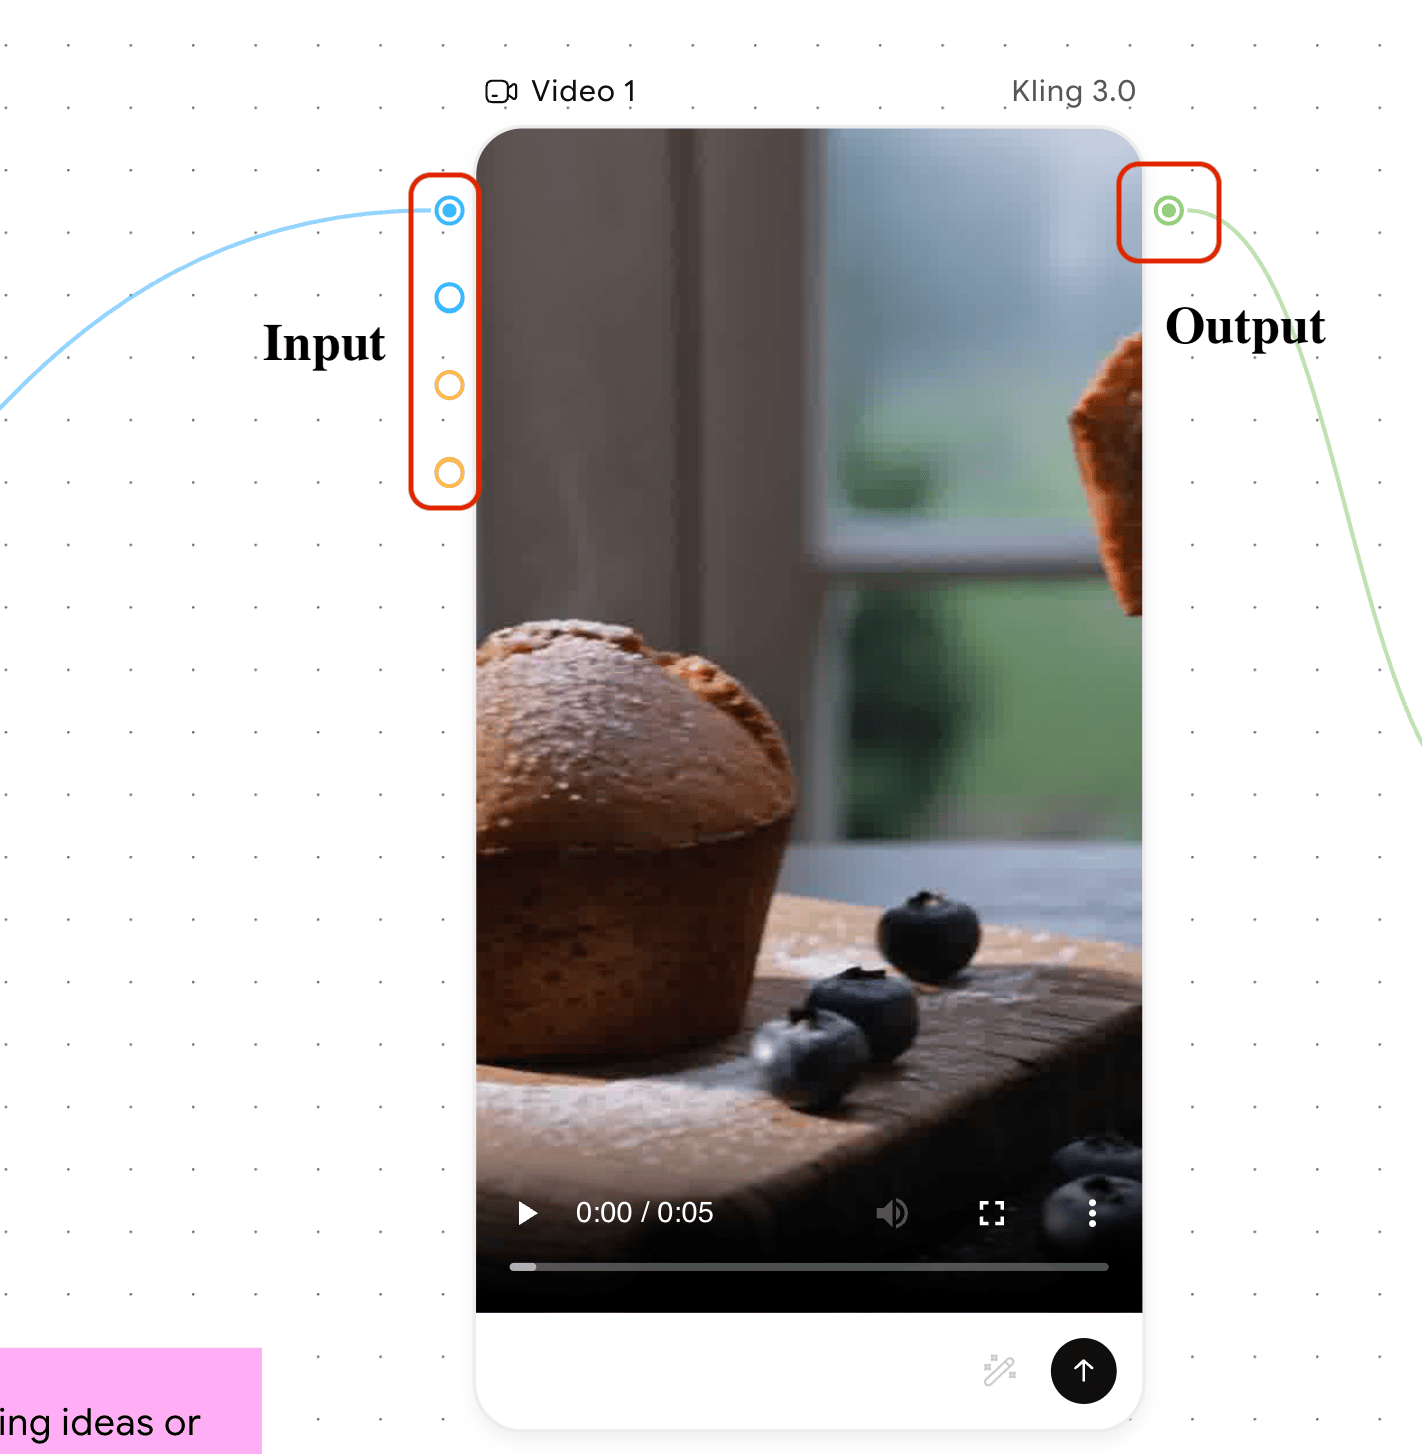
A node is a self-contained unit designed to perform one specific task. Each node has:
- Inputs (left side): Where the node receives data—text, images, video, or audio.
- Outputs (right side): Where the node sends its processed result to the next step.
- Parameters: Settings inside the node that let you fine-tune how it performs its task.
Data flows left to right across the canvas. Nodes are type-safe: a video output can only connect to a video input. When you trigger a workflow, data travels through the chain you’ve built—a text prompt might become an image, which flows into a background remover, and finally into an export node.
Nodes fall into four categories: Generational (AI-powered creators), Transformation (specialists that modify content), Utility (organizers that route and adjust data), and Essential (import/export gates).
Image nodes
Video nodes
Text nodes
Utility nodes
Audio Nodes
Image nodes cover the full image creation pipeline, from generating visuals from scratch to fine-tuning lighting, resizing for multiple platforms, and batch-processing asset sets.To add an image node: Click + in the left toolbar, select Image, then choose the node. You can also double-click the canvas and search by name.Generate Image
Purpose: Create high-quality images from text prompts (text-to-image) or transform existing images using a reference and a description (image-to-image).The Generate Image node supports a wide range of AI models, each with its own style characteristics. Key parameters:| Setting | Type | Effect |
|---|
| Prompt | Text | Describes the visual elements the AI generates |
| Style | Preset | Applies a stylistic preset (3D, Cyberpunk, Watercolor, etc.) |
| Strength | 0–100% | Controls how strongly the prompt influences the output |
| Image Size | Dropdown | Sets the output aspect ratio (16:9, 4:3, 1:1, etc.) |
| Seed | Number | Locks the result for reproducible outputs |
| Guidance Scale | 0–20% | Balances prompt adherence against creative randomness |
| Resolution | Dropdown | Sets output resolution: High (4K), Medium (2K), or Low (1K) |
| Prompt Optimizer | Button | Enhances or rewrites your prompt for better results |
Inputs: Text prompt (from a Prompt or AI Copilot node), optional reference image. Output: Generated image.Edit Image
Purpose: Generate new images inspired by one or more reference images. Rather than modifying an image directly, this node uses your uploaded references as creative inspiration—combining styles, concepts, and visual elements into a fresh output.Models like Nano Banana Pro, Nano Banana 2, and Seedream V4.5 support uploading 10+ reference images, making this node useful for complex compositions that blend multiple visual ideas.Common use cases: Fashion lookbooks, virtual try-ons, 3D art from flat designs, vintage poster variations, mythical creatures in real-world settings.Inputs: One or more reference images, text prompt describing the desired output. Output: Newly generated image based on the references and prompt.Upscale Image
Purpose: Increase the resolution and sharpness of any image using AI. Ideal for preparing low-resolution assets for print, large displays, or professional presentations.| Setting | Type | Effect |
|---|
| Upscaling Factor | 2×, 4×, 8×, 16× | Higher values increase resolution and detail |
| Strength | 0–100% | Controls the AI’s impact on fine details and sharpness |
| Noise Reduction | Slider | Smooths the image; high values may remove fine details |
| Sharpness | 0–100% | Increases edge definition; too high may over-sharpen |
| Detail Level | 0–100% | Controls how much detail is added during upscaling |
| Seed | Number | Ensures reproducible results |
Input: Image. Output: Upscaled image at the specified factor.Multiple Camera Angles
Purpose: Generate new perspective views of a subject from a single reference image. Rotate, tilt, and zoom a virtual camera using an interactive 3D controller to produce angles that weren’t in the original shot.| Setting | Type | Effect |
|---|
| Camera Controller | 3D widget | Drag to orbit the camera around your subject |
| Rotation (Left/Right) | Slider | Horizontal rotation; negative = left, positive = right |
| Move (Up/Down) | Slider | Vertical camera position |
| Zoom | Slider (default: 5) | Camera distance; higher = closer |
| Wide Angle Lens | Checkbox | Simulates a wide-angle lens for more immersive perspectives |
| Guidance Scale | Slider (default: 4.5) | Controls adherence to input and camera settings |
| Seed | Number | Ensures reproducible results |
Input: Reference image. Output: New image from the configured camera angle.Relight
Purpose: Reposition, recolor, and adjust the intensity of the light source on any image. Use the interactive 3D light controller or quick-position presets (Top, Front, Back, Bottom, Left, Right) to transform the mood and depth of a scene without regenerating it.| Setting | Type | Effect |
|---|
| Light Controller | 3D widget | Drag to reposition the light source |
| Quick Positions | Buttons | Snap to a preset direction in one click |
| Reset | Button | Returns the light to its default position |
| Light Intensity | Slider (default: 7) | Controls brightness; higher = stronger, more pronounced lighting |
| Color | Color picker (default: #ffffff) | Sets the light’s color; use warm tones for golden-hour, cool for moonlit |
| Aspect Ratio | Dropdown | Defines the output image dimensions |
| Resolution | Dropdown (1k, 2k, 4k) | Determines output resolution |
Input: Reference image. Output: Relit version of the image.AI Resize
Purpose: Intelligently resize images to different aspect ratios without awkward cropping or stretching. The AI adapts the composition—extending backgrounds and repositioning elements—to fit the new ratio.Unlike the standard Resize utility node (which scales dimensions directly), AI Resize understands the scene and fills in new areas coherently.| Setting | Type | Effect |
|---|
| Aspect Ratio | Dropdown (1:1, 16:9, 4:3, 9:16, etc.) | Target dimensions for the resized image |
Common use cases: Multi-platform ad campaigns (1:1 for Instagram, 9:16 for Stories, 16:9 for YouTube), poster format variations, e-commerce banner adaptation.Input: Image. Output: Image resized to the target aspect ratio.Split Image
Purpose: Divide a single image into a grid of smaller cropped sections. A visual preview shows exactly where the cuts will be made before you run the node.| Setting | Type | Effect |
|---|
| Grid Size | Dropdown (2×2, 3×2, 3×3, 4×2, 4×3, 4×4, 5×5) | Number of output sections (2×2 = 4 images; 5×5 = 25) |
Common use cases: Breaking storyboards into individual frames, extracting panels from comic pages, dividing mood boards into separate reference images.Input: Image. Output: Multiple cropped section images, each passed individually downstream.Image Iterator
Purpose: Feed multiple images into a workflow and process each one individually through the connected downstream nodes. Instead of running your workflow manually for every image, the iterator handles the batch automatically.Common use cases: Batch style transfer across product photos, bulk ad variations with consistent branding, multi-image upscaling in a single run.Inputs: Multiple images (from Import, generated images, or added directly in the node). Output: Each image passed one by one to the next connected node, generating a separate output per input.Common image node combinations
| Combination | Use case |
|---|
| Generate → Upscale | Create an image, then enhance resolution for print |
| Generate → Multiple Camera Angles | Produce a base image, then generate product or character perspectives |
| Import → Image Iterator → Edit Image | Batch-process reference photos through the same style prompt |
| Generate → AI Resize | Create a hero visual, then resize for every ad platform |
| Generate → Relight | Produce a scene, then experiment with different lighting setups |
| Split Image → Upscale | Break a storyboard into frames, then upscale each one |
Video nodes cover the full video production pipeline—generating clips from text or images, enhancing quality, synchronizing audio, transferring motion, and assembling final sequences.To add a video node: Click + in the left toolbar, select Video, then choose the node. You can also double-click the canvas and search by name.Generate Video
Purpose: The primary node for creating videos. Supports both text-to-video (describe a scene) and image-to-video (provide a still image and describe the motion). Supports a wide range of AI models.| Setting | Type | Effect |
|---|
| Model | Dropdown | Selects the AI model; each has unique motion quality, realism, and speed characteristics |
| Duration | Dropdown (e.g., 5s, 10s) | Length of the generated video |
| Resolution | Dropdown (720p, 1080p) | Output video resolution |
| Aspect Ratio | Dropdown (16:9, 9:16, 1:1, 4:3) | Frame dimensions |
| Generate Audio | Checkbox | When enabled, generates a matching audio track (select models) |
| Camera Fixed | Checkbox | Locks the camera; no camera movement in the output |
| Seed | Number | Produces reproducible results with the same seed and settings |
Input modes:
- Text-to-video: Connect a Prompt node and describe the scene. The more specific your description, the closer the output matches your vision.
- Image-to-video: Connect an image as the first frame and describe the desired motion.
Output: Generated video clip.Edit Video
Purpose: Transform existing videos using reference clips and prompts. Describe the changes you want—style shifts, scene alterations, environment swaps, visual effects—and the AI generates a new version of the video.Common use cases: Style transfer (daytime scene → noir night sequence), environment swaps (indoor → futuristic cityscape), brand consistency across clips, adding atmospheric effects like rain or fog.Inputs: Reference video, text prompt describing the changes. Output: Transformed video.Extend Video
Purpose: Generate additional footage that continues seamlessly from where your original video ends. The AI understands the scene’s context, motion, and visual style—then creates new frames that naturally extend the narrative.| Setting | Type | Effect |
|---|
| Model | Dropdown | Affects continuity quality and visual consistency with the source |
| Duration | Dropdown | Amount of additional footage to generate |
| Resolution | Dropdown | Match to your source clip for seamless continuity |
| Aspect Ratio | Dropdown | Should match the original video |
| Generate Audio | Checkbox | Generates matching audio for the extended portion |
| Seed | Number | Ensures reproducible results |
You can optionally add a prompt to guide what happens next. Without a prompt, the AI continues the scene naturally.Input: Video clip to extend. Output: Extended video.Lipsync
Purpose: Generate a talking video from a single character image. Provide a character image and either write a prompt (the AI generates speech and lip movements) or connect your own audio track (the AI syncs lip movements to that audio).| Setting | Type | Effect |
|---|
| Model | Dropdown | Controls speech realism, facial expression quality, and native audio capabilities |
| Duration | Dropdown | Length of the generated video |
| Resolution | Dropdown | Output resolution; higher values produce sharper facial details |
| Aspect Ratio | Dropdown | Frame dimensions |
| Generate Audio | Checkbox | When enabled, generates native spoken audio from your prompt |
| Seed | Number | Reproducible results |
Common use cases: AI influencer content, personalized video outreach at scale, UGC-style ads without on-camera talent.Inputs: Character image (portrait or headshot), text prompt or audio file. Output: Video of the character speaking with synchronized lip movements.Motion Transfer
Purpose: Capture motion from a reference video and apply it to a character image. Upload a reference video of someone dancing, walking, or performing any action—the node transfers that exact movement onto your target character.This node requires two inputs:
- Character Image — the subject you want to animate (clearly lit, full body or relevant body parts visible).
- Reference Video — the motion source (use clips with clear, well-defined movements; avoid heavy occlusion, rapid camera movement, or multiple people).
| Setting | Type | Effect |
|---|
| Model | Dropdown (e.g., Wan 2.2 Move) | Affects how well body types, motion complexity, and rendering quality are handled |
| Guidance Scale | Slider (default: 1) | Lower = more creative freedom; higher = stricter match to source motion |
| Resolution | Dropdown | Higher captures finer detail but takes longer |
| Inference Steps | Slider (default: 20) | More steps = smoother, higher-quality output at the cost of generation time |
| Video Quality | Dropdown (High/Medium/Low) | Overall rendering quality |
| Seed | Number | Reproducible results |
Common use cases: Viral dance videos, animated character performances, virtual try-on with movement.Inputs: Character image, reference video. Output: Video of the character performing the motion from the reference.Upscale Video
Purpose: Increase the resolution and visual quality of an existing video using AI. Sharpens details, improves clarity, and enhances fidelity while preserving natural motion and smoothness.| Setting | Type | Effect |
|---|
| Model | Dropdown | Balances speed, detail preservation, and output quality |
| Upscaling Factor | Dropdown (2×, 4×) | Higher = larger, more detailed output; longer processing time |
| Seed | Number | Reproducible results |
Common use cases: Polishing AI-generated clips from 720p to 1080p/4K, restoring low-resolution footage, preparing content for large displays.Input: Video clip. Output: Upscaled video.Video Trimmer
Purpose: Cut a video down to a specific portion using a visual timeline editor. Preview the clip directly inside the node, drag the trim handles to set start and end points, and output only the segment you need.| Control | Description |
|---|
| Preview Player | Play back the video inside the node; includes play/pause and audio mute |
| Timeline Strip | Frame-by-frame filmstrip; drag start and end handles to define the trim range |
| Timecodes | Displays start time, current playhead, and end time of the selected range |
| Trim Presets | Quick-action buttons: trim start, trim both ends, or trim end |
| Undo / Redo | Step back or forward through trim adjustments |
Input: Video clip. Output: Trimmed video segment.Combine Videos & Audios
This node category covers two distinct operations:Combine Audio & Video — Merges a video input and an audio input into a single video file with the audio track embedded. Both inputs are required. Useful for pairing a generated video with a voiceover, music track, or sound effects.Combine Videos — Joins multiple video clips sequentially into a single continuous video. Clips play in the order they are connected.Inputs for Combine Audio & Video: Video (green handle), Audio (pink handle). Inputs for Combine Videos: Multiple video clips. Output: Single merged video file.Purpose: Capture a single still frame from a video and output it as an image. Specify the exact moment using a frame number or timecode. This is the bridge between your video and image workflows.| Setting | Type | Effect |
|---|
| Frame | Number (default: 1) | Specifies which frame to extract by sequence number |
| Timecode | Time (default: 00:00:00) | Specifies which frame to extract by timestamp (HH:MM:SS) |
Common use case: Pull a key frame from an existing video, edit it with Generate Image or Edit Image, then regenerate a new video from the updated frame.Input: Video clip. Output: Still image extracted from the specified frame.Common video node combinations
| Combination | Use case |
|---|
| Generate Video → Upscale Video | Create a clip, then enhance for professional delivery |
| Generate Video → Extend | Produce a short clip, then extend to the desired length |
| Image → Generate Video → Lipsync | Animate a portrait, then sync lip movements to a voiceover |
| Generate Video → Motion Transfer | Generate a base character video, then apply motion from a reference |
| Generate Video → Video Trimmer → Combine Videos | Create multiple clips, trim each, then assemble into a final sequence |
| Extract Video Frame → Generate Image → Generate Video | Pull a frame, enhance the still, then regenerate a new video |
Text nodes create, refine, and manipulate text—from writing prompts that drive AI generation to combining or splitting content for complex workflows.To add a text node: Click + in the left toolbar, select the node from the Text Utilities category. You can also use keyboard shortcuts on the canvas.Prompt
Purpose: Write custom instructions to guide AI models in generating text, images, or videos. This is the most common input node in any workflow—it holds the text description that downstream nodes act on.Key features:
- Works with all generation types: text, image, and video.
- Combine with multiple generation nodes to reuse the same prompt across different models.
- Chain with AI Copilot to first generate or refine text, then pass it downstream.
Keyboard shortcut: PInput: None (you type the prompt directly into the node). Output: Text string.Example prompts:
- Text: “Write a catchy caption for a social media ad about our new eco-friendly sneakers.”
- Image: “A beach sunset with a silhouette of a person practicing yoga, golden hour light.”
- Video: “A slow-motion close-up of coffee being poured into a ceramic mug, steam rising.”
AI Copilot
Purpose: Generate and analyze text using large language models (LLMs). The AI Copilot node can process text, image, and video inputs to produce high-quality written outputs—scripts, descriptions, analyses, creative pieces, ad copy, and more.Key features:
- Advanced text processing: Leverage top LLMs to process and refine any text input.
- Contextual understanding: Extracts context, personas, and identifiers from inputs, including visual content.
- Multi-input integration: Combine text, images, and videos as inputs for more informed outputs.
- High-quality output: Rich, contextually accurate text for scripts, stories, campaigns, and workflows.
Keyboard shortcut: TInputs: Text, images, or videos (any combination). Output: Generated or analyzed text.Example use cases:
- Write a 5-minute YouTube script from a topic prompt.
- Analyze a video ad and generate consistent marketing copy that matches its tone.
- Create 5 ad copy variations for a Google campaign.
- Write a brand story for a product launch.
Combine Text
Purpose: Merge multiple text inputs into a single, unified output. Ideal for assembling a complete document from separate parts—sections of a script, product features, research notes—before passing the combined text to a generation node.How to use:
- Connect multiple text inputs (from Prompt nodes, AI Copilot outputs, or other text sources).
- The node automatically merges them into one cohesive block.
Common use cases:
- Assembling a full blog post from separate research, quotes, and original writing.
- Merging intro, body, and call-to-action sections into a complete video script.
- Combining product feature bullets into a single e-commerce description.
Inputs: Two or more text streams. Output: Single merged text string.Split Text
Purpose: Break down long or complex text into smaller, manageable sections. Useful for workflows that need to process or generate content scene-by-scene or section-by-section.Split criteria options: By sentence, by paragraph, or by a custom delimiter (commas, keywords, etc.).Common use cases:
- Breaking a video script into individual scenes, then generating a video clip per scene.
- Dividing a voiceover script into sections for audio generation and video syncing.
- Segmenting descriptive text for targeted image generation per section.
Input: Text string. Output: Multiple text segments, each passed individually to downstream nodes. Utility nodes handle the connective work of any workflow—importing assets, exporting results, previewing outputs, routing data, and applying non-AI visual adjustments like cropping, resizing, and color correction.To add a utility node: Click + in the left toolbar, select Utilities, then choose the node. You can also double-click the canvas and search by name.Essentials
Import Upload images, videos, or audio files directly into your workflow. This is the starting point for any workflow that uses your own assets rather than AI-generated content.
- Input: None (you upload a file directly).
- Output: Image, video, or audio file ready to connect to downstream nodes.
Export Save your workflow’s final output to a specific format or destination. Use this as the last node in a workflow to download or publish your finished content.
- Input: Image, video, or audio.
- Output: Downloaded/exported file.
Preview View the output of any node at any point in your workflow without exporting. Useful for checking intermediate results, debugging, or comparing outputs between pipeline stages.
- Input: Image, video, or text.
- Output: Visual display inside the node (no data passed downstream).
Router Direct content to different paths within your workflow. Use the Router to split a workflow into multiple branches—sending the same input to different nodes for parallel processing, or selecting which path to follow based on your setup.
- Input: Image, video, or text.
- Output: Same data routed to one or more downstream branches.
Adjustment nodes
These nodes make quick, non-AI visual modifications to images and videos.Crop Trim an image or video frame to focus on a specific area. Remove unwanted edges, center a subject, or reframe a composition before passing it downstream.Resize Change the dimensions of an image or video by a specific pixel size or scale factor. Unlike AI Resize (which intelligently adapts the composition), this is a straightforward scale operation—useful for meeting specific pixel requirements or optimizing file sizes.Blur Apply a blur effect to an image or video, uniformly or to specific areas. Great for softening backgrounds, creating depth-of-field effects, or obscuring sensitive information.Levels Adjust brightness, contrast, and tonal range. Fine-tune shadows, midtones, and highlights to correct exposure, enhance detail, or give content a specific look.Filters Apply visual filters that change color tone, texture, or overall aesthetic. Options include vintage, high-contrast, warm, cool, and artistic effects for quickly setting the mood of your content.Common utility node combinations
| Combination | Use case |
|---|
| Import → Crop → Generate Image | Upload a reference photo, crop to the relevant area, use it as AI input |
| Generate Video → Levels → Filters → Export | Create a video, correct exposure, apply color grade, export |
| Import → Router → (Multiple Branches) | Route a single asset to different processing paths simultaneously |
| Generate Image → Resize → Preview | Create an image, resize to platform specs, preview before exporting |
| Import → Blur → Crop → Export | Upload a photo, blur the background, reframe, and export |
Audio Nodes in ImagineArt Workflows enable you to generate professional spoken voice, original music, and custom sound effects entirely from text. Whether you need a voiceover for video, a background track, or sound effects for animation, these AI-powered nodes produce broadcast-quality audio that integrates seamlessly into your creative pipeline.To add an Audio node: Click + in the left toolbar, select Audio, then choose the node. You can also double-click the canvas and search by name.